This post may contain affiliate links (including amazon.com because we participate in the Amazon Services LLC Associates Program). Full disclosure is here.
Want to know how to add WordPress links to your blog posts? Guide your readers to what to read next or where to find more great stuff from you online, all by adding WordPress links that they can click on in your blog. If you’re a beginner WordPress user and you’d like to know how to add WordPress links then keep reading – I’ve added screenshots to help you each step of the way.
How many times have you been writing a blog post only to discover that you are trying to squeeze two or three posts into one article? I just spent hours writing about why and how to use NoFollow links in WordPress, only to realize that this won’t help you if you don’t know how to insert links in the WordPress dashboard. And I wanted to add many screenshots cause that’s how I help you.
It was too much to fit in … so today I’ll cover the basics of inserting WordPress links.
Right, let’s walk through inserting WordPress links in your WordPress dashboard!
Step 1: Go to your post in the WordPress dashboard
Write your blog post in your WordPress dashboard. I like to write my articles in Word and then copy and paste them into WordPress. Once your content is in your WordPress dashboard, you can insert WordPress links where you need them or as you type along.
Here’s a pic of what my post looks like in the WordPress dashboard, which is where I can insert all WordPress links:

I use the Classic Editor plugin as I like the previous WordPress editor, so my dashboard might look slightly different to yours if you are using Gutenberg Don’t worry about it as it won’t affect your links.
Step 2: Highlight the text
Highlight the text in your post where you want to insert the WordPress link. Here I’ve highlighted the words that will be used for the link – when visitors click on these words in my blog posts they will be taken through to another article on my blog.
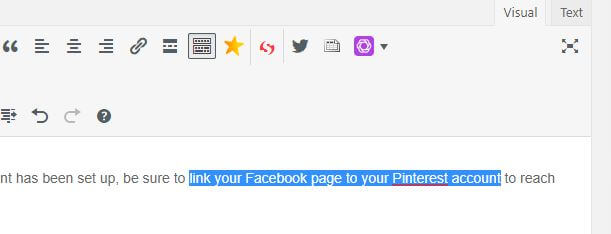
Step 3: Click on the link button
Look at the WordPress menu along the top of your blog post and find the link button that looks like this:

Click on this button.
Step 4: Add the url
A box will open, similar to this:
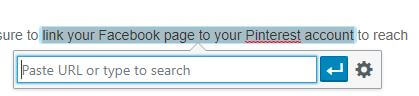
You can either paste in the url (the www address) of where you want the link to take the person who clicks on it. But if you want to link to another one of your blog posts, then it might be easier to click on the gear to the right:
![]()
An option will pop up where you can find existing content (that is other blog posts or content on your website).
![]()
Type a word or two that’s related to the article you want to link to in the search bar. I typed in ‘Facebook’ and it brought up all the articles where the word Facebook appears in the titles or content.
Now click on the existing content article that you want to link to.
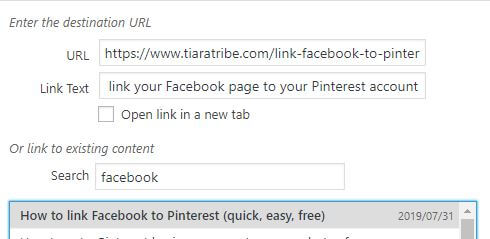
The existing content you select will turn gray (make sure it’s the right article you want to link to) and the url will show up in the URL bar at the top. You don’t have to fill it in 🙂
Your link text is what will show in your blog post as text that can be clicked on to go through to the url.
Once you’ve checked that you are happy with the link text and url, move on to the next step.
Step 5: Add the link
Next you will make the link active and clickable for your readers. Click on ‘Add link’ on the bottom-right corner of the box:
![]()
And there you go – the link has been added to your text:

Step 6: Save your post
Remember to update your post and save it with the changes you’ve just made.
![]()
Step 7: Check your live links
Under publish on the right-hand side, click on the Preview button. This will take you to a preview of your blog post, where you can see your new link as it looks live. Click on it to make sure it works.
![]()
And now you know how to add WordPress links to blog posts via the dashboard. Use these to guide your readers around your blog and to let Google know which content pieces are linked to each other. Try to use at least one link in each blog post to another article.
Want to save this for later or share the love with others? Then save it to your favorite Pinterest board! 


